 Shadow DAOs
Guides
Documentation
Everything you need to launch, gate, and govern a DAO on Shadow DAOs.
Getting started
What Shadow DAOs is and how to take your first steps.
Shadow DAOs is a privacy-first governance platform. You can launch a DAO, gate its membership, raise funds, and run proposals where every ballot is a secret ballot — the tally is public, but nobody (including us) can see how an individual member voted. It works across Midnight, Cardano, and XRPL/Xahau wallets.
Here's the five-minute path from landing here to casting your first vote:
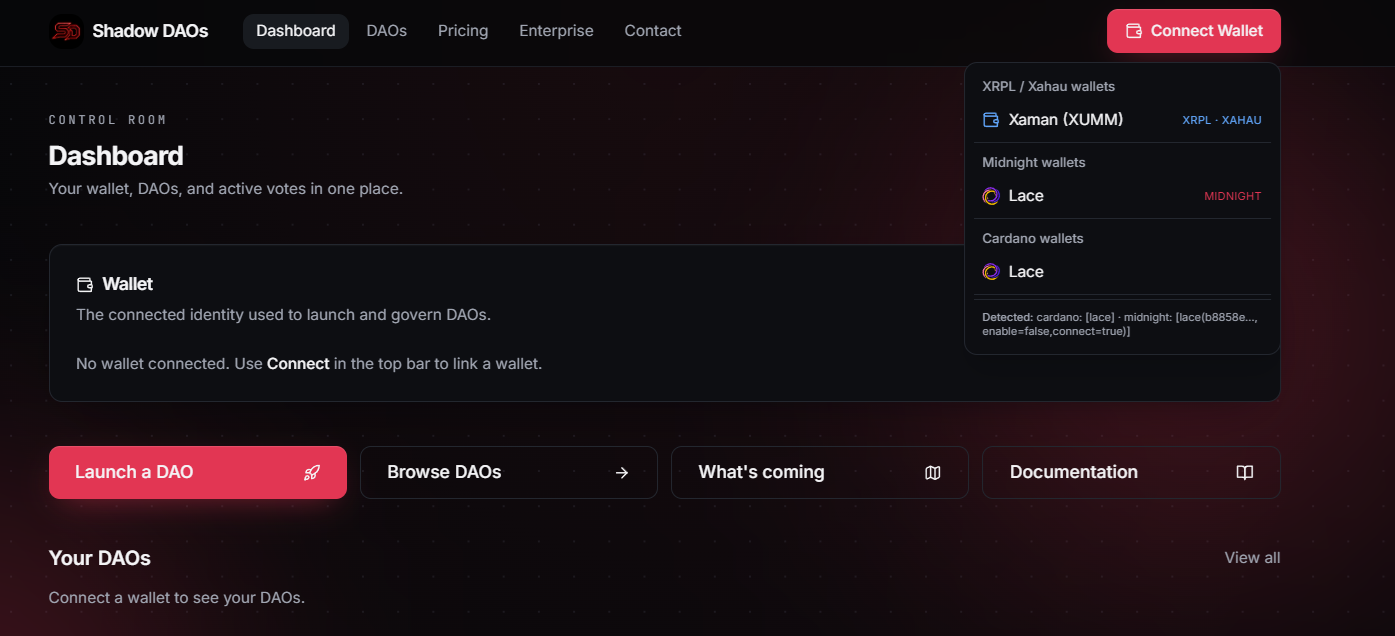
- Connect a wallet. Use Connect in the top bar. We support Midnight (Lace), Cardano (any CIP-30 wallet), and XRPL via Xaman. See Connecting a wallet for details — your wallet is your identity here; there are no accounts or passwords.
The connect menu: pick your wallet — Xaman for XRPL/Xahau, Lace for Midnight, or any CIP-30 Cardano wallet. - Join a DAO — or launch your own. Browse the public directory to find a community, or launch a new DAO from the dashboard. DAOs go live instantly; Midnight launches pay a small one-time fee on-chain. The free plan lets you join unlimited DAOs and create one of your own — paid plans raise the cap and unlock treasury tools (see the pricing page).

The directory: join a community or launch your own DAO. - Vote on proposals. Open your dashboard to see every active vote across your DAOs in one place, and cast your ballot right from there. How windows, quorum, and outcomes work is covered in Proposals and Voting. If you trust someone else's judgment, you can delegate your vote weight to them at any time.
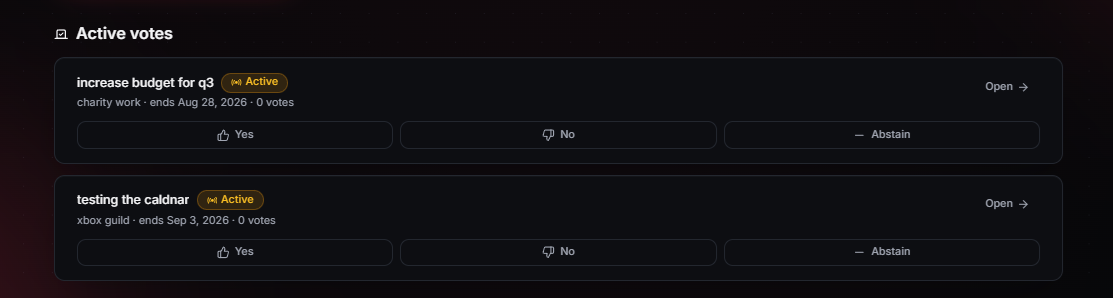
Active votes on the dashboard — every ballot is secret. - Stay on schedule. The dashboard calendar shows every voting deadline, community event, and funding deadline across your DAOs, and each DAO page has its own calendar where members can schedule voice chats and meetings.
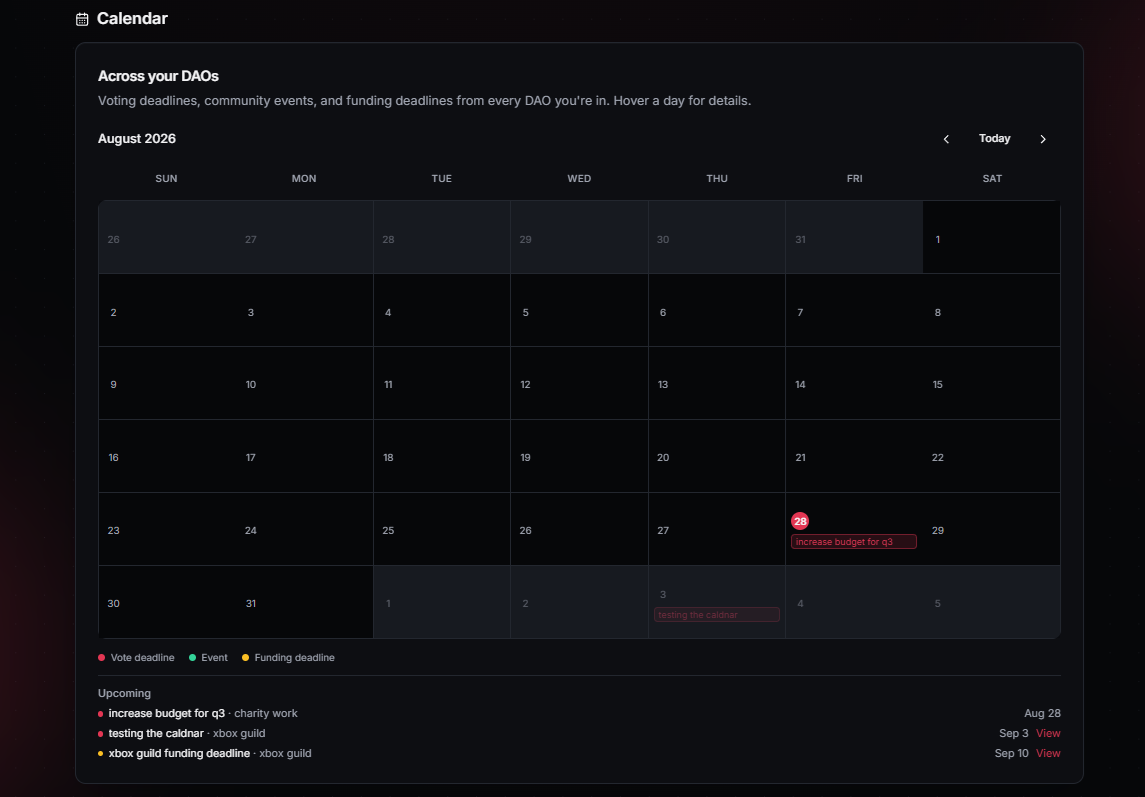
The calendar: deadlines and community events across your DAOs. - Earn your reputation. Every vote and proposal earns XP toward your activity level, and the most active participants appear on the leaderboard — under an alias you choose, never your wallet address.
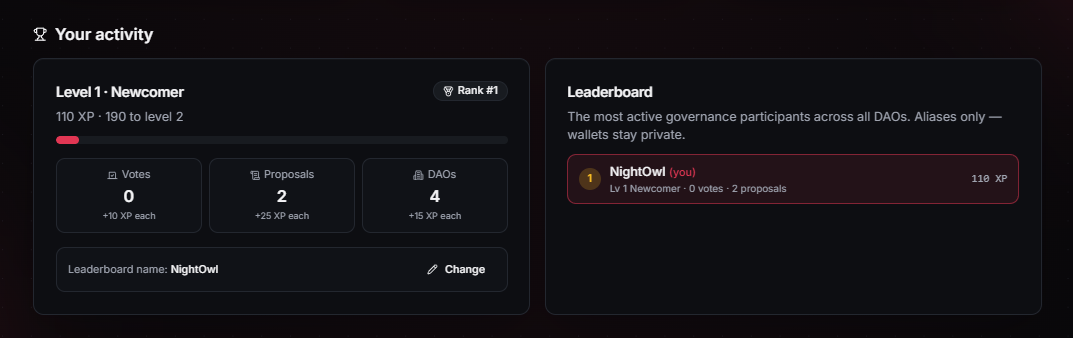
Your activity: levels, XP, and the alias-only leaderboard.
Running a community on Discord? The Shadow DAOs bot brings proposals and voting straight into your server — see Inviting the bot to Discord.
Connecting a wallet
Supported wallets (Midnight, Cardano, XRPL) and how to connect.
Your wallet is your account on Shadow DAOs — there's no email signup and no password. The address you connect with is your identity for joining DAOs, voting, and creating proposals. Click Connect in the top bar and pick your wallet:
- XRPL / Xahau — Xaman (XUMM). No browser extension needed: choose Xaman, scan the QR code with the Xaman app on your phone, and approve the sign-in. Works for both XRPL and Xahau accounts.
- Midnight — Lace. Install the Lace wallet extension with Midnight support. Lace also brings its own proof server, which is what generates the zero-knowledge proofs for private actions — all in your browser, never on our servers.
- Cardano — any CIP-30 wallet. Eternl, Lace, and other CIP-30 browser extensions are detected automatically and listed in the menu.
Good to know:
- Lace chain switching: Lace exposes both Cardano and Midnight. Once connected, open the wallet menu in the top bar to flip between the two chains without reconnecting.
- Wallet not showing? Extensions inject themselves a moment after the page loads — the menu rescans for a few seconds, so reopen it if your wallet didn't appear at first. Make sure the extension is unlocked and has at least one account.
- Disconnecting: click your address in the top bar and choose Disconnect. You can also copy your full address from the same menu.
Creating a DAO
Launching your DAO with the one-time fee and the launch form, field by field.
Launching a DAO is instant: fill in one form, pay a small one-time launch fee, and your DAO goes live with governance open right away. There's no funding phase to wait through — you can add an optional funding pool later from the treasury. Here's the launch form, field by field:
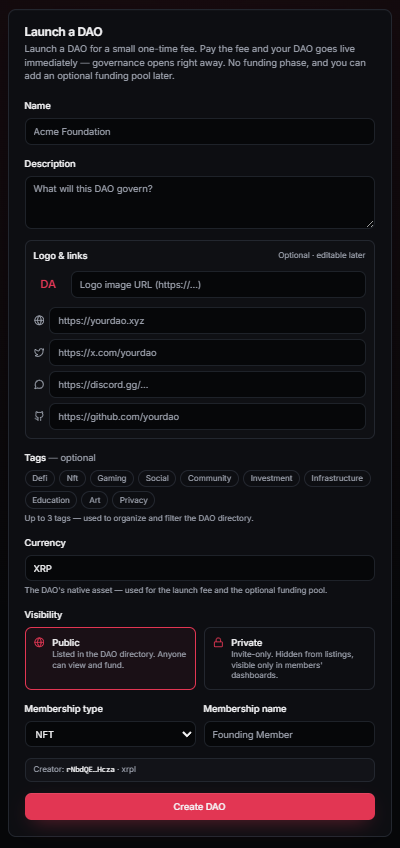
- Name & Description. The DAO's public identity — the name appears in the directory and on every proposal; the description should say what the DAO governs.
- Logo & links (optional, editable later). A logo image URL plus website, X, Discord, and GitHub links. These show on your DAO's public profile so members can find your community.
- Tags (optional, up to 3). Categories like DeFi, Gaming, or Community — they organize and filter the public DAO directory so the right people find you.
- Currency. The DAO's native asset (e.g. XRP or NIGHT) — used for the launch fee and the optional funding pool later. This also determines which chain your DAO lives on.
- Visibility. Public lists the DAO in the directory where anyone can view and fund it; Private keeps it invite-only, hidden from listings and visible only in members' dashboards.
- Membership type & name. The membership asset minted to your community (e.g. an NFT) and what it's called — like "Founding Member." This is the on-chain proof that someone belongs to your DAO.
- Creator. The connected wallet shown at the bottom becomes the DAO's first admin automatically.
Hit Create DAO and pay the launch fee from your wallet — once the payment is detected on-chain, the DAO deploys and goes live. NIGHT (Midnight) launches pay the fee up front; other chains currently launch free and go live immediately.
After launch: invite members or open up self-join rules (see Gating the DAO), create your first proposal (see Proposals), and note that your plan sets how many DAOs you can create — Free covers your first, paid tiers raise the cap.
Gating the DAO
Join policies: invite-only, open, and token / NFT / proof-gated membership.
Every DAO controls how wallets become members. Admins set the join policy from the Membership settings card on the DAO page:
- Invite-only (the default). Admins add members by wallet address from the Invite member card, choosing a role for each: admin (full control), member (can vote), or observer (read-only, no vote).
- Open. Anyone with a connected wallet can self-join from the DAO page with one click.
- Gated. Anyone may join — if their wallet satisfies all of the requirements you configure. Requirements are verified on-chain at the moment they join.

Gate requirement types (you can combine several — applicants must pass every one):
- Token holding. The wallet must hold at least a minimum balance of a token — identified by issuer + currency on XRPL/Xahau, or policy id (+ optional asset name) on Cardano.
- NFT holding. The wallet must own at least N NFTs from an issuer (XRPL, with an optional taxon filter) or a policy id (Cardano).
- Midnight proof. For shielded assets that can't be read on-chain: the applicant's browser generates a zero-knowledge proof against their own proof server attesting they hold the required asset. Only the opaque proof hash ever leaves their machine — the balance itself stays private.
Changing the policy later never removes existing members — it only changes how new ones get in. Roles can be adjusted per member at any time from the member list.
Want to charge for membership instead of (or on top of) holdings? See Paid membership subscriptions.
Paid membership subscriptions
Charge a monthly USD fee to join your DAO, with a transparent revenue split.
On top of the join policies above, a DAO can put its membership behind a paid subscription. This is billed in real USD through PayPal — not crypto — using the same billing rails as the platform's own plans. Members pay a monthly price the organizer sets, and every payment is split three ways:
- 5% platform fee — fixed, taken automatically by the platform (which collects the PayPal payment).
- Organizer fee — the DAO creator's pay, set anywhere from 0% to 95% with a slider. Paid out to the PayPal email the organizer configures.
- DAO treasury — everything left over. Only the organizer fee is stored; the treasury share is always derived (100% − 5% − organizer fee), so the split can never be misstated.
Setting it up (admins). Open the Membership subscription (USD) card on your DAO page, enable the gate, set the monthly price and your organizer fee, and add your PayPal payout email. Saving provisions a PayPal billing plan for your DAO. Requires the $50/mo Community plan (Tier 2), and the server must have PayPal billing configured.
Joining (members). The DAO's join panel shows the monthly price and the full split before you pay — the revenue share is always transparent. Subscribe with the PayPal button; once PayPal approves, you're enrolled as a member automatically. Renewals are handled by PayPal each month, and cancelling keeps your membership access until the end of the period you already paid for.
Good to know:
- Changing the organizer fee or price only applies to future payments — every settled payment keeps a record of the split that was in force when it was made.
- Changing the price creates a new PayPal plan; existing subscribers keep billing at the price they signed up for.
- The organizer and treasury shares accrue on a revenue ledger (visible on the admin card) and are disbursed by the platform — organizer payouts go to the configured PayPal email.
- The subscription gate can be combined with the token/NFT requirements above: an active subscription is the entry ticket for self-joining, and admins can still invite anyone manually.
Inviting the bot to Discord
Installing the Shadow DAOs bot and linking it to your server.
The Shadow DAOs bot brings governance into your Discord server: members link their wallets once, then create proposals, vote, and get new-proposal announcements without leaving Discord. Setup takes three steps:
- Invite the bot. As a DAO admin, open your DAO's page — the Discord bot card has the install link. Invite it to your server.
- Bind the server to your DAO. In Discord, a server admin runs
/setup project_id:<your id>— the ready-made command (with your id filled in) is on the same card, one click to copy. One server binds to one DAO;/disconnectunbinds it if you ever need to switch. - Pick an announcement channel. Run
/announce-herein the channel that should receive new-proposal announcements.

Members link their wallets once, then vote from Discord — the DAO's rules (roles, proposal policy, secret ballots) are enforced exactly as on the site:
/link-xrpl— sign in with a Xaman QR code (or paste an r… address)/link-cardano— sign to prove ownership (or paste an addr1… address)/link-midnight— paste your unshielded address (mn_addr_…)/unlink— remove your wallet link from the server
Day-to-day commands:
/proposals— privately list active proposals (/proposals-publicposts them to the channel)/propose— create a proposal with a title, description, voting window (days, or 1/4/12-hour rapid votes), and optional custom quorum/vote— cast a yes / no / abstain ballot with your linked wallet/statusand/treasury— DAO overview, treasury balance, and donation address
Discord bot access is part of the Starter plan and up — see the pricing page.
Proposals
Creating, activating, and managing proposals.
Proposals are how a DAO decides things. Each one has a title, a description of what's being decided, a voting window, and a quorum — and every ballot cast on it is secret.
Who can create proposals is a DAO setting (the proposal policy): admins only (the default), or any member except observers. It applies everywhere — the site and the Discord /propose command enforce the same rule.

A proposal moves through a simple lifecycle:
- Draft. Created but not yet open for voting. When it's created, the DAO's voting power is frozen in a snapshot — each member's weight and the total — so the goalposts can't move after the fact.
- Active. Activation opens the voting window: a number of days (up to 90), or a rapid 1 / 4 / 12-hour window for quick decisions. The deadline appears on the DAO calendar automatically.
- Passed or failed. When the window closes, the proposal is finalized: it passes if participation met the quorum and yes outweighs no. After finalize, the per-voter records are purged — only the aggregate tally remains.
Quorum — the minimum participation for a valid result:
- Automatic (default): a majority (>50%) of the snapshot's total voting weight — member headcount in equal mode, token weight in weighted mode (see Token-weighted voting).
- Custom: the proposer can set a specific percent (1–100) of the total circulating weight for this proposal only. The DAO's own auto-quorum percent can also be configured by admins in governance settings.
Two proposal types exist: general (any decision) and treasury (backs a spend request — the spend can only execute if the proposal passes; see Treasury). Members can also discuss each proposal in its comment thread while the vote runs. For how ballots themselves work — choices, secrecy, delegation — see Voting.
Voting
Casting votes, quorum, and how results are decided.
This section is coming soon.
Token-weighted voting
Equal vs. weighted mode and configuring a governance asset per chain.
This section is coming soon.
Treasury
DAO treasury wallets, balances, and treasury proposals.
This section is coming soon.
Funding campaigns
Raising funds through the launchpad: goals, deadlines, contributions, refunds.
This section is coming soon.
Privacy on Midnight
Shielded balances, holding proofs, and what stays private.
This section is coming soon.
Plans & subscriptions
Free vs. paid tiers and managing your subscription.
This section is coming soon.
Troubleshooting & FAQ
Common issues (network mismatches, wallet errors) and where to get help.
This section is coming soon.
Updating these docs
How to write, edit, and reorganize the sections on this page.
Everything on this page lives in one file: app/docs/content.tsx. Each section is an object in the DOC_SECTIONS array, and this page renders them in order.
Writing a section
- Open
app/docs/content.tsxand find the section by itstitleorid. - Replace
body: nullwith JSX wrapped in a fragment, e.g.body: (<> <p>Your text…</p> </>). Paragraphs, bullet lists (<ul><li>), numbered steps (<ol><li>), sub-headings (<h3>), links, and<code>snippets are all styled automatically. - Save — the page hot-reloads in dev; no other file needs to change.
Adding, removing, or reordering sections
- Add: copy an existing object, give it a unique
id(this becomes the URL anchor, e.g./docs#voting), atitle, an icon fromlucide-react, and a one-linesummary. - Reorder: move the object within the array — the sidebar and page follow the array order.
- Remove: delete the object. Any links to its anchor simply scroll to the top of the page.
Sections with body: null show a "coming soon" placeholder, so you can sketch the outline first and fill content in later.